Detecting SSH Activity via Process Monitoring
During my time as a threat hunter, I’ve seen many intrusions start via SSH access using legitimate credentials. Now you might be thinking why on earth are users enabling the SSH service on macOS. Is that really necessary for basic users? Of course for basic users, the answer is no. It’s not necessary at all, but I’d argue the odds are very good that macOS based build servers, test servers, and developer systems will frequently have SSH enabled. Not only that, but once an attacker gains access to a system via any means SSH is a fantastic “live off the land” technique used for lateral movement about a compromised network.
Meet the Players
To understand how to best track different SSH behaviors, we first have to familiarize ourselves with the different binaries that play a role in creating an SSH session. Here they are, each with a brief summary of their responsibilities.
/usr/libexec/smd
The smd binary (or presumably Service Management Daemon) is what actually controls whether or not SSH is enabled or disabled. Over time Apple has moved more responsibility into this daemon.
/usr/sbin/sshd
This is the main SSH service executable. When you attempt to log in to a system multiple instances of sshd are kicked off in order to handle the login process and the user session. This is probably the most common service that comes to mind when dealing with SSH.
/usr/libexec/sshd-keygen-wrapper
This sshd helper process kicks off on a login attempt. It often immediately exec’s into the sshd service. There are some use cases where sshd-keygen-wrapper performs some different actions, but on most SSH setups the process does exactly what the name implies.
/usr/bin/ssh-agent (-l)
Despite its name, ssh-agent is not actually the service listening for SSH connections. In fact, this process is probably running on your system even if SSH is disabled! It’s best known for the management of SSH keys. It is not actually required in order for a user to log in via username and password. It’s launchagent can be seen at /System/Library/LaunchAgents/com.openssh.ssh-agent.plist where it is loaded at start up with the undocumented -l argument.
The shell
You shouldn’t need much introduction here. After the authentication process, an interactive shell is spawned on the system that will carry out the commands at the user’s request. This shell is whatever shell the user has set as their default. In my case, it’s zsh.
General Behavior
In order to better understand how these processes are all connected, let’s walk through the steps that occur when logging in over SSH. On macOS, SSH logins can be enabled by going to System Preferences > Sharing > Remote Login. Note that enabling this feature doesn’t actually create any new sshd process of any type. This is somewhat disappointing because it means we can’t do a simple process monitoring to determine if SSH has been enabled or disabled, but if you log in with SSH and leave the session open, you should now have something like the following process tree.

If you look at standard ps output, you’ll notice that this tree looks a bit different. In fact, using TrueTree was the only way I even realized that smd played a role in the management of SSH. (For more on the TrueTree model go check out my previous blog posts). This is also the reason there aren’t any signs of an SSH service listener in your ps output until you attempt to log in. The smd service handles multiple different remote login services as well as other items that you enable or disable via the system preferences. All processes below smd in the above screenshot will exist after a login attempt occurs with the exception of the zsh shell which occurs after the login is successful. First we see sshd-keygen-wrapper get created. This tiny binary quickly handles a few checks before exec’ing into sshd. And yes, two sshd processes are created when a login occurs. Note however, that if another login occurs while this login is ongoing, all of the same processes seen above are created again. By this, I mean to say that neither of the sshd services seen above will act as a “master” for additional logins. Finally, the second sshd instance will spawn a shell from which all future commands that the user enters will originate.
Before moving on, it’s important to note that there are other ways to enable the SSHD service. In fact, I’d argue the enabling of remote logins done via System Preferences is less of a concern than if someone was to do it from the command line. Rather than loading a LaunchDaemon, a user can enable remote logins from the command line by using the systemsetup command.
sudo systemsetup -setremotelogin on In order for this command to work root is required. The good news is with any type of EDR you should be able to monitor when a command like this is executed.
Picking Up Login Attempts
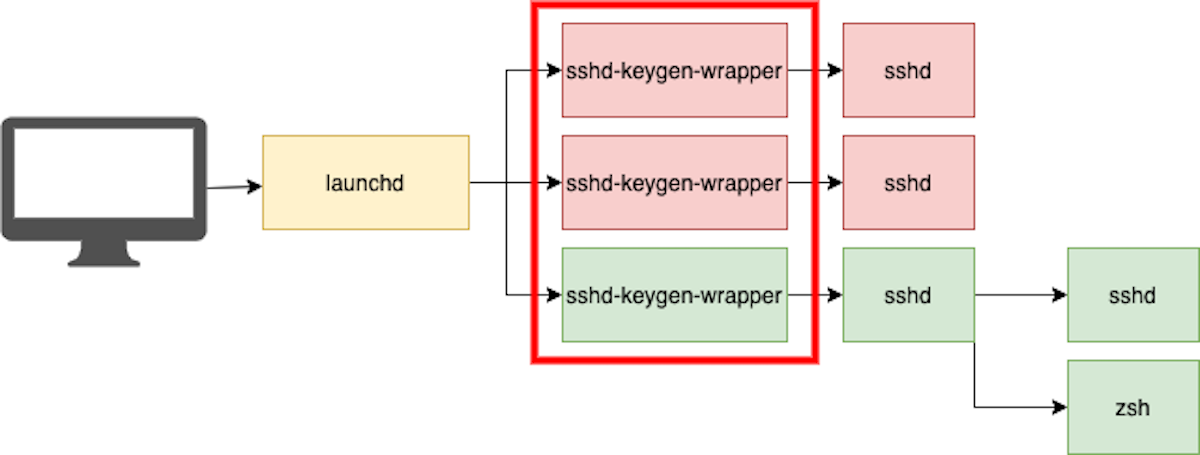
Given the process tree discussed above you might already know where I’m going with this section. As mentioned above, we end up with three processes that spawn on SSH login attempts: one of which is sshd-keygen-wrapper and two of which are sshd. We know that the sshd-keygen-wrapper only exists for a split second before exec’ing itself into sshd. Here’s what three login attempts might look like on the system.

(Note that in the above picture we’re using the non TrueTree view of processes since this is what EDR’s will provide. This is why launchd is shown as the parent instead of smd.)
In the above image you see three attempted SSH logins. Two failed and therefore never spawned a shell (red), and one was successful (green). Regardless of whether or not the login succeeds, sshd-keygen-wrapper is always spawned on a one to one ratio of a login attempt. This means we can track login attempts by tracking its execution!
Picking up dictionary attack attempts
Does anybody still dictionary attack SSH? Believe it or not I’ve seen successful attempts during my career. Usually this was from Linux botnets that send massive amounts of credentials to try and work their way into public facing SSH servers. A public facing SSH server on macOS is another rarity, but hey, why not? Obviously I can’t speak to your specific setup and tooling, so I’ll just stick with some generic Splunk lingo since it tends to be the standard in event monitoring. Your best bet here is to follow the same logic above by looking for large grouped attempts of sshd-keygen-wrapper. I find this the easiest to do by using Splunk’s “bin” functionality (also known as bucket).
event=process_create path=/usr/libexec/sshd-keygen-wrapper
| bucket _time span=5m host_name
| eventstats dc(host_name) as attempts by _time
| where attempts > 20
| stats values(host_name)
Let’s break down what’s happening here.
event=process_create path=/usr/libexec/sshd-keygen-wrapper
Find all the times sshd-keygen-wrapper was executed.
bucket _time span=5m
Group the found sshd-keygen-wrapper processes into time windows of two minutes.
eventstats dc(host_name) as attempts by _time
Take the now bucketed processes and do a distinct count by host to get how many attempts took place. Name this newly counted field “attempts.”
where attempts > 20
Look for where more than 20 attempts occurred within one of these two minute buckets.
stats values(host_name)
Return the host names that match the above criteria.
And there you have it. Given that your Splunk instance has access to this type of data, this should return instances where 20 login attempts happened within two minutes. You can play with the numbers however you want, but I suspect 20 login attempts in two minutes would likely indicate malicious play.
Picking up a single login
Catching a successful login isn’t overly complicated either. In fact I’ll use the same image as before.

As long as your tooling allows you to make connections via parent child relationships all you need to do is look for any time a shell is created where the parent of that shell is sshd. Note that on macOS the default built in shells (as seen in /etc/shells) are /bin/bash, /bin/csh, /bin/dash, /bin/ksh, /bin/sh, /bin/tcsh, and /bin/zsh.
From a Splunk perspective there shouldn’t be anything too complicated here. You just want to look up any time a shell runs where the ppid path is that of “/usr/sbin/sshd.” Note here that this will also pick up situations where someone chooses to run a single command over SSH without creating an interactive login. An example of this is something like…
ssh user@ip_address whoami
Instead of creating an interactive session, the above command will log in over SSH, execute the whoami command, and return the output to the client who ran it. The sshd executable performs this by passing the -c argument to the shell it creates along with the command specified by the sender.

If you’re looking for interactive SSH logins look for times where a shell is created under SSH and the command line contains no additional arguments (or where CommandLine==Path). If you’re only looking for one-off commands run over SSH look for times where the command line contains multiple arguments.
Picking Up Root Logins
Logins occurring over SSH obviously do not guarantee something malicious happened. Plenty of technologies and developers depend on SSH to be active in order to accomplish different tasks. However, these technologies and developers should be logging into systems with normal privileges and then escalating via sudo. Logging directly into an SSH server as the root user is not considered best practice. It’s kind of like if you are planning to park at a commuter lot overnight and choose to drive your Lamborghini there instead of your Pontiac Aztek. Sure you can take the Lamborghini but if someone decides to target you and steal your car…well…now they have a car with higher privileges. Alright…admittedly that analogy fell apart.
Many process tracking technologies provide the user id of the executed process more commonly referred to as the uid. Every user on a Unix system is assigned a uid. On macOS the first user is given the uid of 501 and the root user is 0. We can tell which user logged in by looking at the uid of the created shell processes. Here’s an example of a tree for a user who logs in with basic permissions.

In the above image we see that the uid for both the forked sshd child and the shell matches that of the basic user 501 and therefore we know that the user who logged into the system is not root. Meanwhile, we see that all of the processes prior to the login are owned by the root user which makes sense since sshd operates as root on the system and hands off according privileges to users as they log in. Of course, if someone logs in as root, the shell that gets created would continue to be uid 0. So to detect root logins over SSH we can simply use the same method we did in the previous section, but specify that we only care when the uid of the created shell under SSH is that of 0.
Building the history
For a final section of this post, I want to speak briefly to an item that is often overlooked. This item is the tty. A tty or a teletype terminal gets assigned any time someone opens a true interactive shell. That is to say, a user can type commands, and the shell can prompt back. Without a tty you would not be able to interact with your precious sudo command when it asks you to enter your password. You would simply type into dead space. A tty gets assigned to the created shell process and will continue to be used for all child processes created during this SSH session.

Here you see that the tty on my shell upon login is /dev/ttys001. Again this will depend on your tooling and whether your writing detects that look real time or are retroactive, but what this means is that if you ever discover a malicious SSH login and have the ability to view a tty field, you can simply pull back all of the commands executed in that SSH session by looking for processes that share the same tty.
The only hiccup here is that when a user closes a tty it will be reused the next time one is needed. In other words, if the user on this system frequently opens the Terminal, searching for all processes that use /dev/ttys001 might also provide you with some older but legitimate actions performed by the user. If this happens you might also have to rely on some timelining (or completely different approach) to pull back all of the malicious SSH commands.
Conclusion
As mentioned many times in this post, a lot of the lookups seen above will depend on your technologies and tooling, but more than anything it’s important to know your environment and understand what systems should actually be using SSH. This of course will come easier to those working at smaller companies who are able to easily keep tabs on who is logging into where, but it’s important for big companies to monitor these items as well. Remote Logins are an awesome tool for administrators who need to get on to systems to perform actions, but from a security perspective they’re a bit of a triple threat.
- They’re built in (Attackers love living off the land)
- They can be used for initial entry
- They can be used for lateral movement
Here we just touched on what process activity tied to SSH looks like. There is still an incredible amount to explore when it comes to locking down SSH as well as how attackers leverage it. We may explore these things in later blog posts.
Additional Note
One of the reasons I haven’t updated the site in a while is because I received an Apple Endpoint Security Framework entitlement a while back. I’ve been learning with it and hope to release some new tools in the future. Stay tuned…
